Reflections of an Artist

Six Steps for Painting the Coast
5/19/2016 11:56:28 AM | By Sharon Weaver | 2 Comments
I recently demonstrated how to paint the coast for a local art club and decided to do a step by step instructive guide. I thought that both artists and non artists would enjoy seeing the process from start to finish so below are the six steps with detailed instruction.
For those of you who are artists the six steps can be used for any painting but the exact instructions in each step are for painting the coastline.
Step 1: Draw in the main elements. I like to use Ultramarine Blue and Alizarin Crimson and a flat boar bristle brush.
Step 2: Establish the shadows. This is especially important when painting plein air where the light will change dramatically in a short time.
Step 3: Paint four or five main shapes. This step will take the longest to do but keep it simple by reducing the scene into shapes. For this painting my five shapes are the sky, the ocean, the sand, the rocks and the cliffs. Note that the sky is darker at the top right and becomes lighter as it moves to the bottom left. The water starts bluer at the horizon and becomes greener as you move closer. There is a shallow area at the sands edge that reflects the blue sky.

Step 4: Create three-dimensional form with highlights, midtones and darks. I added the highlights on the cliffs and rocks. I also added the darker green of the wave.
Step 5: Work on edges and refine your shapes. I softened the horizon line. Then I refined the palm trees with darks and sky-holes. I refined the rocks with highlights and darks, improving the shapes. I added the foam to the wave. I included different colors and values in the sand.
Step 6: Finish with the final details. I added a highlight to the walkway. I put foam in the foreground at the waters edge. I continued to refine the rocks and the cliff.
Using these basic six steps in all my paintings allows me to tackle any scene with confidence.
Workshop with Matt Smith
2/6/2014 5:50:47 PM | By Sharon Weaver | Comment on this
Every artist needs to recharge their batteries once in a while so when I heard that Matt Smith was doing a local workshop through the California Art Club, I decided to sign up. Apparently lots of other artists felt the same way and called before I did so I was put on the wait list. Lucky for me someone canceled and I was in.
Matt is an artist I admire, who finds beauty and drama in some of the most difficult subjects. He paints scenes that most artists would never consider and renders them with a sensitive beauty that transcends the ordinary subject. I couldn't wait to see his demonstration. Matt is a master at using lovely neutral tones throughout his paintings against highlights that are both bold and delicate.
Here is a great example of a blocked in painting from his demo on the first day. Look at those wonderful blue greys that fill the painting. There are so many subtle value shifts with soft color changes that form the rock shapes. Warm and cool greys that define the masses.

Matt feels that the painting is made successful by the colors in the shadows so it is no wonder that he has developed a wonderful range of dark colors that he uses to block in the majority of the painting. Even when most of the reference is in sunlight, Matt blocks in the painting with darks expanding the shadows. These dark neutrals are needed so that the lighter areas will stand out in contrast. This method allows him to find drama in the simplest things.
I have not had the time to digest all the gems that where being tossed out and look forward to incorporating Matt's unique vision into my own paintings. I want to use the information while it is still fresh and easy to recall so I am anxious to get out there and paint.
Here is the finished painting by Matt Smith from the first day's demonstration. Enjoy! Thank you Matt for all the inspiration.


Painting Trees
10/9/2013 5:37:54 PM | By Sharon Weaver | Comment on this
Overlooking the Canyon is one of many paintings that I will be showing at the upcoming show: Art, For Heaven's Sake!
Trees can be a constant source of inspiration or a problem that must be solved. In todays Fine Art Views Newsletter there was an excellent article on how to paint trees that I wanted to share. There are some really good examples and several invaluable tips. Enjoy.
Painting Tree Foliage: Light and Shadow
by Lori Woodward
The main thing to remember, for trees, and every other subject that you depict, is that shadow areas are relatively flat and colorless, while areas in light have volume and a higher saturation of color. Without light, we just can't see much - no shape, no color. There is less light in the shadow, so we see fewer detail and color in those shadows. [...]
Read the rest of this article at:
http://faso.com/fineartviews/66096/painting-tree-foliage-light-and-shadow
----------------------------------------------
This excerpt appears courtesy of FineArtViews Art Marketing Newsletter by FASO,
a free email newsletter about art, marketing, inspiration and fine living for artists,
collectors and galleries (and anyone else who loves art).
For a complimentary subscription, visit: http://www.faso.com/art-marketing-newsletter

William Wray Demonstration
9/7/2012 12:04:52 AM | By Sharon Weaver | Comment on this
One of the many things I love about local art clubs is the wonderful demonstrations that they have at the monthly meetings. This last Tuesday the San Fernando Valley Art Club had artist William Wray for the demonstrator. William is known for his urban landscapes that push composition, shapes and color into near abstraction.
He was nice enough to hand out printed information that gave everyone an inside view into his thought process. When deciding on a scene to paint first he asks a lot of questions and these questions will also help you to make the right choices. Here are things to ask before you start to paint.
1) Why do you want to paint the scene?
2) What emotional response does the subject give you?
3) What are the dominant design elements and how can you strengthen them?
4) Is your view too complicated? If so, can you make it a simple, strong design?
5) Does your subject have too many problems to solve to reduce it to a simple design? If so, try a simpler subject.
Once you have answered these questions and evaluated your composition, do a thumb nail sketch to help you refine and define the subject. Using photo software, William will also push the colors to be more intense and look for two complements to use for the main areas of color. By cropping the subject, he will hone in on the center of interest, reduce details and organize the image into a simple, clear view. During this process he will also focus on the "target" with supporting shapes that frame the center of interest.
Finally it is time to start painting! William uses inexpensive house painting brushes to block in the large shapes. He keeps it simple, colorful and uses lots of paint, even in the initial block in. On his second pass, I was fascinated to watch him use his palette knife to play with the edges, refining, mixing together and never keeping perfectly straight lines, even on the buildings. He told us that he likes to let the painting dry and then work over the dry paint with other colors and values. He often uses washes that allow some of the under color to influence the glazing color. He will usually go back in three times, each layer refining the image. A fourth and final pass is to add small details.
It was very interesting to see and have him discuss his process. Thank you to William Wray for his wonderful demonstration.
Teaching the Art of Plein Air
5/14/2012 2:14:51 AM | By Sharon Weaver | 2 Comments
Learn the fundamentals necessary for successful landscape painting in the open air (plein air). The process will be broken down into achievable steps through demonstrations, on-location painting and personalized critiques. The techniques of plein air painting will be explored with a focus on composition, understanding values, establishing a focal point, and learning to edit from the wealth of material in nature. Every week we will meet at a different site where I will start with a demonstration focusing on the essentials of plein air painting. Students will then paint on location with individualized critiques. Every plein air experience is a unique challenge with the objective of capturing a moment in time. Whether you are a beginner or an established plein air painter, my goal is to give you the tools to become a better artist through observation, simplification, and the appreciation of painting from nature.

Painting Water Reflections
4/4/2012 4:36:14 PM | By Sharon Weaver | 2 Comments
Last night I demonstrated for the San Fernando Valley Art Club. I have a soft spot for the club since it was the first art club I joined five years ago. Thinking back, it is amazing how much I didn't know about the world of art. I was so green I didn't know what I didn't know. Five years later, I am forever grateful to the generosity of all the members, the support I have gotten and all the instruction from the many demonstrating artists.
You could say I have come full circle since I am now the one giving the demo, hoping to inspire and help other artists. Afterward, I was thrilled with all the questions, kind words and enthusiasm from the group.
Following are the first two stages of the painting I used for the demonstration. The finished painting called Arboretum Reflections (shown above) is for sale at Fine Art and Antique on Lake in Pasadena.

Blocking in the Shapes
Working out the composition is the most important starting step. Without a good, strong composition the painting can never succeed. Decide what you are painting; the water, the trees? Make the commitment with the positioning of the horizon line.

Establishing the Relationship between the Sky and Water
Water is almost always darker than the sky, so it is essential to establish the relationship between these two areas. Remember to first paint the depth of the water with vertical brushstrokes. This will give the water dimension. Wait to paint the water surface until after you have painted all the other shapes. Only then go back and paint the surface of the water.
Later this month on April 17, I will be doing another demonstration for the Bellflower Art Association at Thompson Park, 14000 Bellflower Blvd., Bellflower, CA from 6 PM to 8:30PM. For more information Contact Sharon or call Charlene Mueller at 562-633-9011.
How to Paint Water
4/2/2012 8:37:50 PM | By Sharon Weaver | Comment on this
I hope you will join me for the demonstration at the San Fernando Art Club on April 3rd.

Join us on Tuesday, April 3rd when plein air artist and San Fernando Valley Art Club member, Sharon Weaver, shares her techniques on painting a professional landscape in oils.
Sharon won “Best of Show” at the last two SFVAC Exhibits. She enjoys participating in the challenge of plein air competitions. Her work appears in galleries and museums as well as private collections. She is represented by Gallery Elite in Carmel, CA, Segil Gallery in Monrovia, CA, and La Galeria Gitana in San Fernando, CA.
Tuesday, April 3, 2012
6:30pm - Social time
7:00pm - Art Demonstration
Encino Community Center
4935 Balboa Blvd.
Encino

The First Time Demo Artist
8/16/2011 6:17:01 PM | By Sharon Weaver | 3 Comments
 Sharon Weaver after Demo at SCA
I realized a while ago that teaching is a very important part of an artists resume so I knew I would have to dive into doing demos soon. The perfect opportunity presented itself when I received an email from Patty O'Hearn with the Santa Clarita Artists' Association asking if I would do a demonstration for the club.
I accepted, hoping that I was up for the challenge. The demo seemed far off in the future but before I knew it, the day was here. Luckily, I had already decided to approach the demonstration with "composition" as a central theme. I had some wonderful examples of bad compositions which I borrowed from Stapleton Kearns' Blog of bad ideas. It is always fun to start with what you shouldn't do and the row of potato shaped clouds really broke the ice.
I also took my two favorite books, Alla Prima by Richard Schmid and Composition of Outdoor Painting by Edgar Payne and passed them around. I believe that with only these two books everyone can learn the principles of creating great art.
Of course, at some point I had to actually start painting. The challenge was to paint and talk about something else at the same time. Not an easy task when you think about all the decision involved in creating a painting. Without the necessary concentration, I fear my demo painting may have suffered. I was OK if I could just paint but then someone would ask a question and suddenly my mind was yanked from the painting to retrieve a response. Pretty tough.
My fears were dispelled when several members of the group came over to tell me how much they enjoyed the demonstration before having to leave. It was a gratifying moment. I think I now get why teachers teach. Sharing your knowledge, enthusiasm and experiences is fun. Having a group who responds with so much warmth and appreciation makes it memorable. Thank you to the wonderful members of the Santa Clarita Artists' Association.
Painting Unusual Shapes
3/7/2011 2:22:13 PM | By Sharon Weaver | 2 Comments

Photos pose different problems. With a plein air study, I have already edited out unnecessary objects that can confuse the composition but a photograph still contains every single detail so when picking a photo I try to forget about the details. Without the luxury of an edited image, I focus on composition and especially look for unusual shapes.
I remembered a photo I had taken at Dana Point during the San Clemente Plein Air Competition 2009. When I found the photo, it was better than I remembered with a cross armature (see my sketch outlining the structure of the composition).
I loved all the quirky details of the image, the bird, the garbage can, the barrel, the peeling paint but it was ultimately the interesting shapes that convinced me this would make a wonderful larger painting. A cross armature is a very dramatic structure and after doing the sketch, I decided the horizontal arm would be even more dramatic using an elongated canvas.
Remember when picking a photo to use for a larger painting, first consider the composition, look for interesting shapes, emphasize the structure and edit the details.
Street Scene Demo by Junn Roca
2/15/2011 9:04:13 PM | By Sharon Weaver | Comment on this
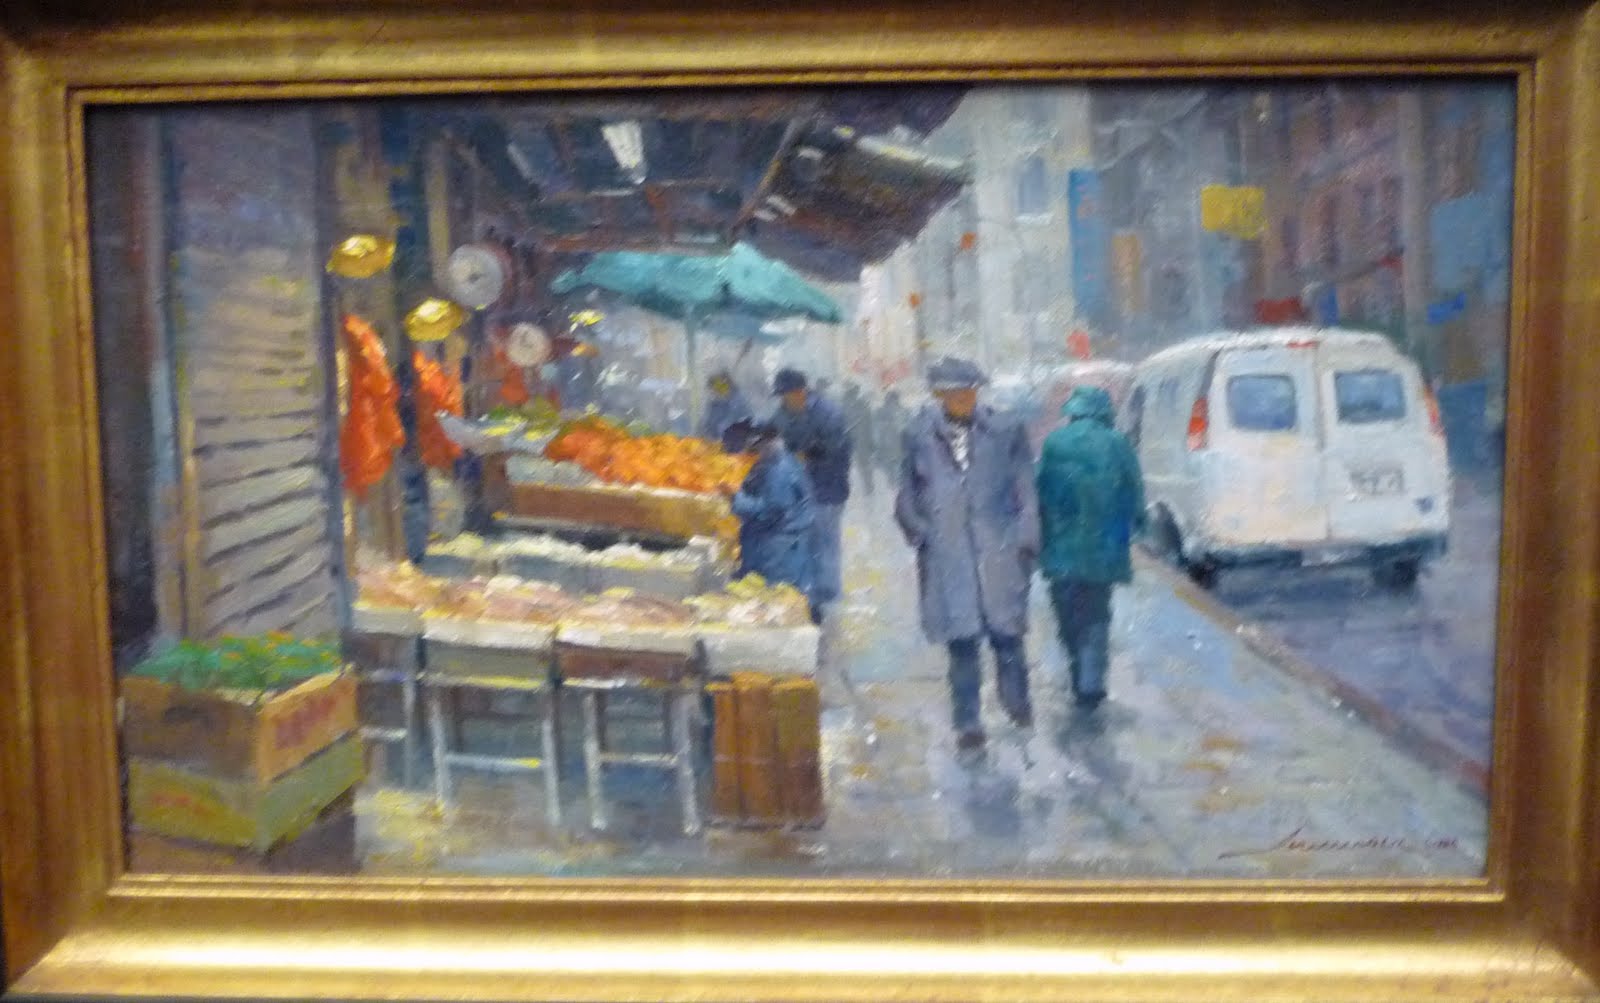 New York Street Scene in the Rain by Junn Roca
 #1 Demo
 #2 Demo
 #3 Demo
 Final Demo
I hope you enjoyed this small summary of the demo. I had a great time. Thank you to Junn Roca and VAG for a wonderful event.
Calvin Liang Painting the Ocean
12/14/2010 10:08:51 AM | By Sharon Weaver | 1 Comment
 Third Demo by Calvin Liang


It was fascinating to watch him play. The back and forth was very interesting as he applied the paint, blending some together while keeping other areas separate for contrast. The finished painting was rich with color, texture and movement. Here is another blog called Jose's Art Journal: Calvin Liang's Workshop Day Three regarding edge work. Thank you Calvin for putting on a wonderful show.
Calvin Liang: Second Demo
12/9/2010 10:51:50 AM | By Sharon Weaver | Comment on this

 Calvin Paints the Shadows
He said that a successful artist paints the air. I think this is a wonderful way to approach a painting. Many times I have painted at the same location with the only difference being the weather. The air is really what changes; the humidity, the light and the temperature all have a profound effect on color, value and mood.
 Calvin Works on the Details

Calvin Liang's Completed Second Demo
Throughout the day, Calvin again emphasized the need to paint the shape, not the thing. He repeated his mantra of the first day; instead of the thing (the building, the ocean, etc) think of 1) Shape 2) Value 3) Color 4) Edges
Calvin Liang Landscape Demo
12/7/2010 9:45:25 AM | By Sharon Weaver | 1 Comment

1. SHAPE- Paint the shape not the thing. If you paint the thing it will never look right. Also keep the shapes varied and unique
2. VALUE- In plein air painting keep your values to five
3. COLOR- Decide whether a color is cool, warm
4. EDGES- Vary the edges between soft, sharp or lost throughout the painting
Watching Calvin begin to draw in the basic forms, it is obvious his drawing skills are amazing. He connects all the dark shapes to make an interesting composition.


Finished Painting by Calvin Liang
Now it was time to put in the details and refine the shapes. Here is where Calvin is a master. A few added details brought everything together. Watching him play with the paint was wonderful. He would smear it in some places and make a sharp line in others. He added the flags and the boat fittings with the smallest of brushes. Note that even in these details the line is broken, the color lighter at the bottom and darker at the top. His name is a wonderful addition to the painting.
You can see the painting I did near the same spot called "Rest Stop."
Mian Situ Demo: Finished Portrait
11/22/2010 9:08:35 AM | By Sharon Weaver | 4 Comments
In my prvious blog post I wrote about the Mian Situ demonstration. This is the final chapter and Mian completes the portrait.
Mian Situ is one of only a few artists who achieve master status when they are alive. I have admired his work at the Masters of the American West Exhibition at the Autry Museum and at the Gold Medal Show for the California Art Club so I was very fortunate to be able to attend a portrait demo by Mian last weekend through the CAC.
 Portraits True Colors
 Mian Situ Continues After the Break
Mian continued to apply the colors to the face and then began to work in the details of the eyes and mouth. Above he is creating the shadows around the eyes. Even with only forty minutes to paint he managed to achieve a remarkable level of detail.
 Portrait after Second Break

 Using a Palette Knife
With a palette knife, Mian applied the background forming interesting shapes that hinted at the wallpaper. He carved into the hair color with the neutral colors while allowing the background to be the positive space.
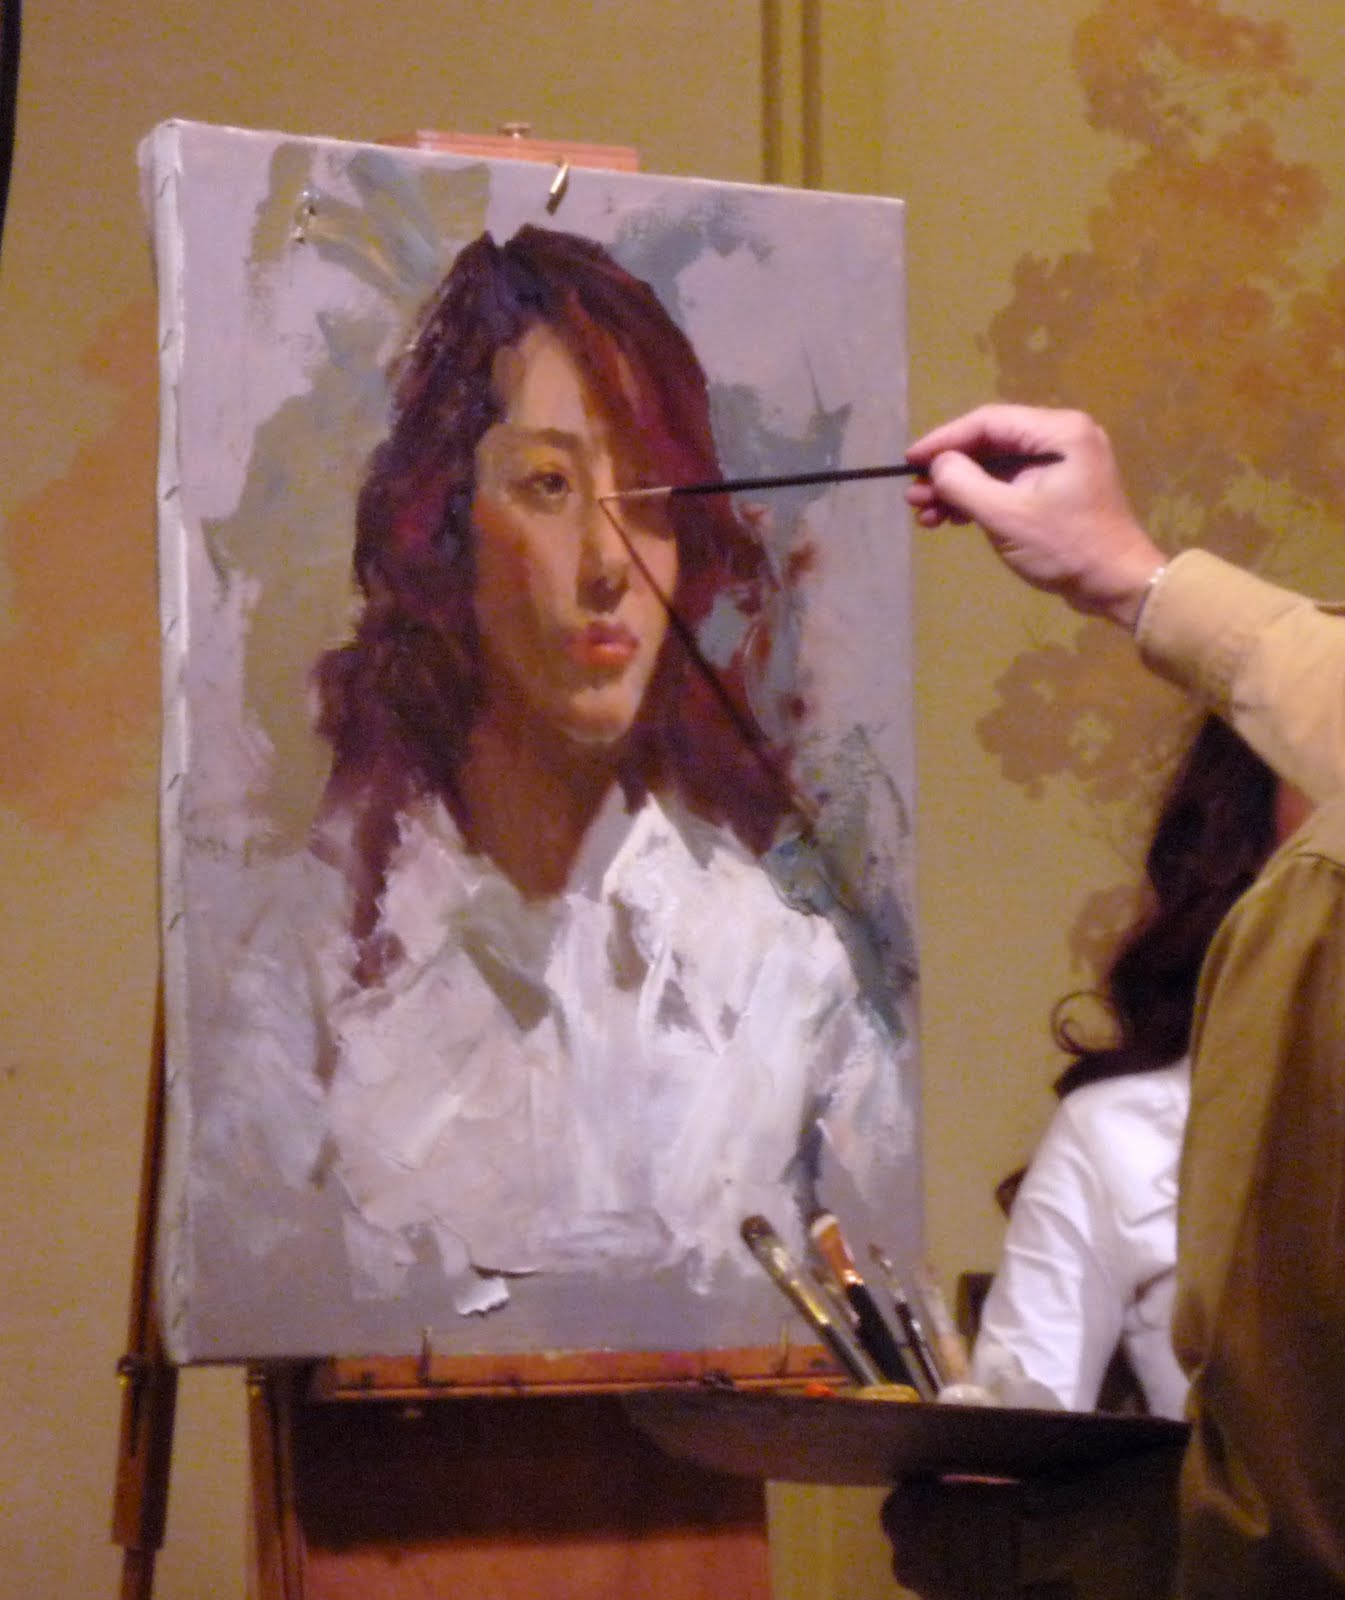 With fine brushes Mian worked on the details of the face. He captured the subtle nuances of the mouth and eyes. The portrait was nearly complete.

 Final Portrait by Mian Situ
Thank you to Mian Situ and the California Art Club for making this event a once in a lifetime experience.
Topics
Archives
Recent Works |
|||

|

|

|

|

|

|

|

|
